Chaos Rising Player & Collector Guide: Every Card Worth Knowing, Every Decision Worth Making
A practical guide to navigating Chaos Rising — from what to pull at pre-release to how to adjust your decklists before the May 21st release.Chaos Rising is a small set. At just 86 cards, it's one of the smallest main set releases in recent Pokemon TCG memory. But small doesn't mean simple. One card in this set is already in more Japanese competitive decklists than all other 85 cards put together. Another introduces a new tier-1 archetype. A third revives a tank strategy many players had written off.
This guide walks you through everything — the competitive impact of each noteworthy card, how to evaluate your pre-release pulls, and what decisions you should be making before this set hits on May 21st.
Part 1: Understanding the Format Before You Build
Before diving into individual cards, it helps to understand what you're stepping into. Chaos Rising arrives with Dragapult holding approximately 25% meta share in Japan. That context shapes everything.The Pre-Chaos Rising Meta in Brief:
- Dragapult is dominant, using DLO draw engine and spread damage with Adrenabrain
- Slowking tank exists but has been underpowered offensively
- Mega Lucario and Beedrill-based Boliva archetypes are fringe-to-tier
- Judge and hand disruption are played but inconsistently effective late game
Chaos Rising doesn't flip this. It intensifies it in some ways, opens a lane in others, and adds a new archetype that hasn't existed before.
Part 2: The Cards You Need to Understand
Special Red Card — The Format Definer
What it does: Play this Item when your opponent has three or fewer Prize cards remaining. They shuffle their hand into their deck and draw three cards.This is the most impactful card in Chaos Rising, and it isn't close. Over 3,000 Japanese decklists include it. Add up every other card in the set — all 85 of them — and they don't reach 1,000 combined appearances. That ratio tells you everything.
Why it's so strong:
Late game hand disruption has always been powerful in Pokemon TCG. Judge has been the gold standard for years — and Special Red Card doesn't fully replace Judge, since Judge can be found with Meowth and played early. But Special Red Card triggers the disruption at exactly the worst moment for your opponent: when they have three or fewer prizes, which is when they're preparing to close out the game.
A four-card hand wiped to three drawn cards, at the moment your opponent has assembled their win condition. That's the hit.
The Dragapult angle:
Most decks have to dig for disruption. Petrol, Cipher Maniac — these are what "budget" hand-disruption decks lean on late. Dragapult has the DLO draw engine, which means it will always have access to Special Red Card when it needs it.
Layer in the Dust Noir interaction: if you're careless enough to KO Bedu or Adrippy early in the game, Dragapult can blow up a Dust Noir, forcing you onto Red Card turns every single turn from that point forward. One Stamp per game used to be the ceiling for this kind of disruption. Against a skilled Dragapult player, you're looking at repeated late-game stamping.
How to counter it:
- Psyduck is the primary answer. Run it. Post-Chaos Rising, not running Psyduck is a real disadvantage.
- Fez & Dipity, Dumpspar, Mega Kangaskhan — if you're playing a deck that doesn't run Monkey Dory and can't fit Psyduck, these give you ways to avoid being hand-screwed in the final turns.
- Alakazam players specifically — get Fez into your list now. The card is essentially mandatory.
Deckbuilding note: Special Red Card will be in virtually every competitive deck. Budget for 2–4 copies before the price climbs after release.
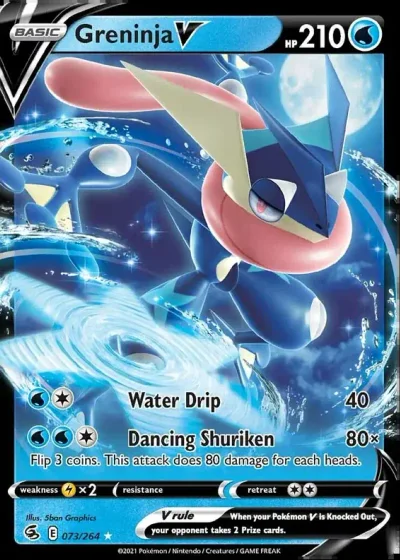
Mega Greninja (Ninjex) — The New Tier Threat
The Stats:- Stage 2 Water
- Ability: Mortal Shuriken
- Attack: 200 damage for 2 energy
Mortal Shuriken: Once per turn, discard a Water energy from your hand to place 6 damage counters on any one of your opponent's Pokemon. The target must be in the active position, but Surfing Beach and Air Balloon move bench Pokemon to the active, working around that requirement. Son of a Beach removes Battle Cage, which would otherwise prevent bench damage placement.
Mega Greninja's attack stats mirror Dragapult's: Stage 2, 200 damage for 2 energy, with spread damage through its ability. It is, frankly, a Dragapult-inspired design wearing Greninja's skin.
Playing the deck:
The strongest version of Mega Greninja runs Terra Greninja for lightning and colorless matchup coverage. Neopper is frequently the target opponents go after, since Ninja Spinner only hits 200 if you return an energy to hand — prize pressure from Neopper creates awkward energy management.
The good news: Mega Greninja doesn't have to be your only attacker. Pairing it with Mega Frost Lass, Mega Star Memy, or Dust Noir while using Mortal Shuriken to chip down the board gives you a flexible, math-intensive gameplan. Crust and Festival Lead — which would protect against direct attacks — don't stop damage counters. Spread decks love Mega Greninja.
What to keep in mind:
All of Mega Greninja's key support (Terra Greninja, Neopper, Ninja Spinner) is H block. They rotate in early 2027. In 2026, this doesn't matter — but if you're investing heavily in the deck, know the clock is ticking.
Bench vulnerability math:
- 120 HP or less (Monkey Dory, Dcloak): 2 Mortal Shurikens = KO
- 60 HP or less (Abra, Small Live): 1 Mortal Shuriken = free prize
Any deck with small bench sitters needs to prepare for Mega Greninja.
Prism Tower — The Quiet Workhorse
What it does: Stadium. Discard 2 cards from your hand → draw 1.This looks terrible on paper. It is not terrible.
Prism Tower is not a draw card — it is a hand-thinning and discard-pile enabler. The distinction matters a lot.
Who uses it and why:
| Deck | Why Prism Tower Works |
|---|---|
| Serge | Builds damage in the discard pile |
| Archaladon | Gets energy into discard ahead of Assembled Alloy |
| Team Rocket Spyops | Unique discard synergy |
| Garchomp | Clears dead late-game cards (Culverus, Petrol) before Corkcrew Dive draws 6 |
Caveats: Your opponent can use it too, same as Grandree. In Slowking matchups specifically, activating Culverus through Prism Tower lets them attack with Hurum every turn for a single energy. Know when not to play it.
Finding Prism Tower is easy thanks to Culverus and Petrol search lines. Expect it as a 1–2 of in Serge, Archaladon, and Garchomp lists immediately.
Metagross — Slowking's New Best Friend
The attack: Discard three Metal energy to deal 300 damage.The controversial part: because of how the attack is worded, you declare that you're discarding three Metal energy. The text does not require you to have done so — unlike cards such as Janine's Secret Art, which explicitly state "if you discarded in this way, deal X more damage." Metagross just says do it. The ruling stands: similar to Wellspring Ogrepon benching off two energy and still sniping the bench, Metagross can swing for 300 even without three Metal attached.
Slowking tank reborn:
Before Chaos Rising, Slowking relied on Conqueror as its primary attacker at 250 damage. Metagross upgrades that ceiling to 300. Combined with:
- Q Room: 110 damage, three times
- Annihilate: Instantly KOs both actives if no Boomerang Energy is attached
- Metagross (300): Now the premier single-hit threat
Slowking has three genuine win conditions. That's what was missing. The tank is back.
The single-prize Metal angle:
Metagross evolves from Matang, which means the baby Metal major deck (Reggie Das, Heatran, Mega Starry, Mega Mile) gains a powerful secondary attacker. With a Brave Bangal attached, Metagross OHKOs Dragapult. That matchup question mark gets answered.
Deckbuilding note for Archaladon: If you've overcommitted Archaladon energy, Felipe functions as a backup Assembled Alloy — accelerate two basic Metal to any Metal Pokemon, including Metagross, to restore your heavy-hitter.
Beedrill X — The Glass Cannon with a Real Deck
The attack (Rumbling Bees): 110 damage × number of Beedrill and Beedrill EX you have in play, for 1 Grass energy.| Beedrill in Play | Damage |
|---|---|
| 1 | 110 |
| 2 | 220 |
| 3 | 330 (OHKOs Dragapult, most relevant threats) |
| 4 | 440 (theoretical max; strongest potential attack in Standard) |
The home deck — Boliva:
Beedrill X alongside Ogrepon and Meganium. Currently a top-five deck in Japan. Bug Catching Set finds the full Beedrill line. Dawn also searches them. The deck is real, and it's performing.
Prizing is the Achilles' heel:
If Beedrill get prized, the whole strategy collapses. Run Redeemable Ticket to search for prized copies and maintain your damage output. This isn't optional — it's essential to the deck's consistency.
The wording note:
Rumbling Bees counts "Beedrill and Beedrill X" only. Future Mega Beedrill EX cards, if released, would not count toward the damage total. There is no regular Beedrill in Standard currently — Beedrill X is counting itself and other copies of itself.
Petrat — One-Of Utility, Not a Build-Around
The ability (Watchful Eye): Both players can't use Monkey Dory.Note: both players. Not just your opponent.
This is why Petrat isn't widely adopted. Everything from Dragapult to Crystal to Star Memy uses Monkey Dory. Running Petrat actively hurts those decks as much as it hurts opponents. Running it alongside Battle Cage is also complicated — Watchtower from Team Rocket shuts down both.
Where it earns a 1-of slot:
Baby Okey Dogie. That deck relies on two-shotting opponents, and a Dragapult player's Adrenabrain pushes things out of two-shot range. Petrat counters that. It's searchable with Poffen and Fan ROM.
If your deck doesn't use Monkey Dory and needs Adrenabrain coverage, Petrat is worth consideration. For most decks, it's not worth the slot.
AZ's Tranquility — Niche Switch with a Bonus
What it does: Supporter. Switch your active Pokemon to the bench. If the active is an EX, heal 80 damage.Jumbo Ice Cream is better in most situations. Kieran has the same switch effect plus 30 bonus damage. AZ's competitive niche is narrow but real:
- Mega Lucario: Two retreat cost means AZ saves a retreat energy discard; contextual 80 healing is a bonus
- Mega Greninja: Needs to reach active for Mortal Shuriken, then needs to get off the bench afterward; AZ provides switch under item lock
- Garchomp: A power-weighted Garchomp requiring three Phantom Dives to KO; AZ can reset trap attempts
It's findable with Meowth, which is meaningful. It won't make waves in most lists, but in the right deck, it earns its slot.
Felipe — Metal Energy Recovery
What it does: Supporter. Accelerate 2 basic Metal energy from discard pile to one of your Metal Pokemon.Current Metal energy acceleration already exists through Matang, Steven's Metagross, and Archaladon. Felipe isn't filling a critical gap — it's providing redundancy and emergency recovery.
Best uses:
- Baby Metagross: Late-game insurance for guaranteeing 300 damage (Felipe = +100 damage from Matang's metal count)
- Archaladon: If you've overcommitted, Felipe replicates Assembled Alloy as a last resort to power up Mega Mile or another finisher
Treat Felipe as a break-glass card, not a cornerstone. One-of in the right lists.
Bubble Water Energy — Set and Forget
One copy in mega Water decks. Prevents and cures status conditions. Searchable with Hilda and Chorus.Its main job now: blocking confusion from a desperation Monkey Dory. Not flashy, but consistent.
Looking forward: When Pitch Black releases in July, Bubble Water Energy shuts off Mega Dark Ride's entire one-hit KO strategy — unless they play Enhanced Hammer, which counters it. Its value may increase meaningfully in that meta context. Mist Energy (colorless, but also blocks Powerful Hand from Alakazam) is worth comparing directly.
Deoxys — Prize-Stealing Tech
One-of in Steven's Metagross lists. 120 to active + 120 to bench for five energy (three Psychic, two Metagross energy). Requires two Metagross in play plus a Psychic in hand.If your opponent doesn't run Shaman and doesn't anticipate the Boss KO combo, Deoxys steals two prizes and can force an early concede. If they do run Shaman, the strategy falls apart. At 120 HP, Dust-ard kills it cleanly.
Use it as a 1-of surprise angle, not a primary win condition.
Part 3: Pre-Release Guide — What to Chase
Pull Priority Tier List
Tier 1 — Chase at All Costs:- Gold Mega Greninja X (~150,000 yen in Japan)
- Roughly double the Mega Revolution gold cards
- Nearly four times the Perfect Order Zygarde gold
- For context: about half of Charizard gold, but that's an unfair comparison — nothing non-Charizard reaches Charizard prices
- SIR Mega Greninja EX (~55,000 yen in Japan)
- Very clear #2 card in the set
- Strong as both a competitive card and a collector piece
- Major drop-off after this — the set has a sharp cliff
Tier 2 — Happy to Pull:
- Chinino SIR (~5,000 yen) — charming card, #3 in set, but ~1/11th the Greninja value
- Full Art Mega Greninja — #4 card in set; FA of a very playable card
Tier 3 — Worth Keeping, Not Worth Chasing:
- Dragali / Mega Floette SIRs (~2,500 yen each)
- Froakie / Froggadier illustration rares — watch for western market pumping based on popularity
- Xerneas / Chespin illustration rares — moderate appeal
Tier 4 — Playability Without Value:
- Roxy / AZ SIRs (~1,100–1,500 yen) — low for SIRs
- Special Red Card FA — extremely playable, full art trainers rarely hold value
- Jumbo Ice Cream FA — same situation
The Key Insight: This set is structured like Fantasmal Flames. Gold + SIR of the same Pokemon dominate the value story, then everything falls off a cliff. In Fantasmal Flames, it was the Charizard gold and the Charizard SIR. Here, it's Greninja twice. If you don't pull the Greninja, you haven't pulled the set.
Part 4: Deckbuilding Adjustments for Chaos Rising
Universal Changes (Every Competitive Deck)
Add Psyduck. Special Red Card will be everywhere. This is non-negotiable for any deck trying to win games post-May 21st.Consider late-game hand protection. Fez & Dipity, Dumpspar, and Mega Kangaskhan all give you tools to avoid being hand-screwed when opponents slam Special Red Card in the final turns.
Reevaluate your Judge count. Judge remains useful early-game (Meowth accessible). Special Red Card doesn't replace it — they're complementary. But your disruption package math may need revisiting.
Dragapult
Add: 2–4 Special Red Card. The DLO engine guarantees access; this card is better in Dragapult than anywhere else.Existing tech: Dust Noir + Special Red Card interaction creates a repeatable stamp loop. Know when to apply this and protect Bedu/Adrippy from early KOs.
No major structural changes needed. The deck gets stronger from Chaos Rising with minimal additions.
Slowking Tank
Add: Metagross line (Matang → Metagross). This is the reason Slowking is competitive again.Win conditions now: Q Room (chip), Metagross (300 swing), Annihilate (double KO).
Prism Tower can find a home here for discard pile management.
Felipe as a 1-of backup accelerator is worth considering alongside the existing metal acceleration package.
Mega Greninja (New Archetype)
Core: Froakie → Frogadier → Mega Greninja. Surfing Beach, Air Balloon for positioning. Son of a Beach to clear Battle Cage.Support attackers: Terra Greninja (lightning/colorless coverage), Mega Frost Lass, Mega Star Memy, Dust Noir.
AZ's Tranquility earns a slot here — Greninja needs active positioning for Mortal Shuriken, then needs to get off the bench.
Consider: Bubble Water Energy as a 1-of for status condition protection.
Remember: H block rotation comes in early 2027. Build the deck knowing it has a defined shelf life in its current form.
Boliva (Beedrill X)
Core: Full Beedrill line + Ogrepon + Meganium. Bug Catching Set, Dawn for consistency.Essential: 1–2 Redeemable Ticket. Prizing a Beedrill is catastrophic. This is mandatory, not optional.
Special Red Card slots in here too — virtually every deck runs it.
Weakness: Prize pressure and item lock are hard matchups. Know your bad matchups and prepare sideboard decisions (if applicable) accordingly.
Baby Metal Major
Add: Metagross line from Matang. Now has a heavy hitter that OHKOs Dragapult with Brave Bangal attached.Keep: Reggie Das, Heatran, Mega Starry, Mega Mile as core.
Felipe as 1-of recovery for late-game Metal energy needs.
Part 5: Common Mistakes to Avoid Post-Chaos Rising
1. Not running Psyduck.Special Red Card is in everything. The format has changed. Run the duck.
2. Overpaying for full art trainers.
Special Red Card FA and Jumbo Ice Cream FA look great and are very playable. They won't hold value. Buy them to play, not to invest.
3. Treating Chaos Rising like a normal-sized set.
It's 86 cards. The value floor on most pulls is low. Go in with calibrated expectations and you won't be disappointed by your pre-release box.
4. Sleeping on Slowking.
Metagross changes the matchup math significantly. If your deck is poorly positioned against a 300-damage threat plus two other win conditions, prepare for it now.
5. Building Mega Greninja without Terra Greninja.
The lightning and colorless matchup coverage from Terra Greninja isn't optional support — it's core to the deck's ability to handle major meta threats. Don't skip the line.
6. KOing Bedu or Adrippy early against Dragapult.
This activates the Dust Noir + Special Red Card loop. Prioritize different targets or accept the late-game stamping if you can't avoid it.
Quick Reference: Chaos Rising Cards by Role
| Card | Type | Primary Role | Best Deck |
|---|---|---|---|
| Special Red Card | Item | Late-game disruption | Universal |
| Mega Greninja | Pokemon (Stage 2) | Spread damage attacker | Mega Greninja |
| Prism Tower | Stadium | Discard setup / hand thin | Archaladon, Garchomp, Serge |
| Metagross | Pokemon (Stage 2) | 300 damage finisher | Slowking, Baby Metal |
| Beedrill X | Pokemon (Stage 2) | Scaling damage attacker | Boliva |
| Petrat | Pokemon | Monkey Dory counter | Baby Okey Dogie |
| AZ's Tranquility | Supporter | Switch + heal | Mega Lucario, Mega Greninja |
| Felipe | Supporter | Metal energy recovery | Baby Metagross, Archaladon |
| Bubble Water Energy | Special Energy | Status protection | Mega Water |
| Deoxys | Pokemon | Prize-stealing tech | Steven's Metagross |
Summary: What to Know, What to Do
Chaos Rising is a small set with outsized influence in two specific areas: Special Red Card reshapes the entire format's late game, and Mega Greninja introduces a new tier-competitive archetype.Outside those two cards, Metagross brings Slowking back to relevance, Prism Tower quietly slots into multiple discard-based strategies, and Beedrill X fuels a real top-five deck in Japan.
The pull structure is top-heavy. The competitive impact is concentrated. The set rewards players who understand what it's actually doing — and punishes those who ignore Special Red Card.
Know what you're building for. Know what you're pulling for. Then go get the duck in your list.
Guide compiled from Japanese competitive results and pre-release market data as of May 2026. Card effects and rulings based on Japanese card text and official rulings available at time of writing. Always verify rulings with your local tournament organizer for official events.